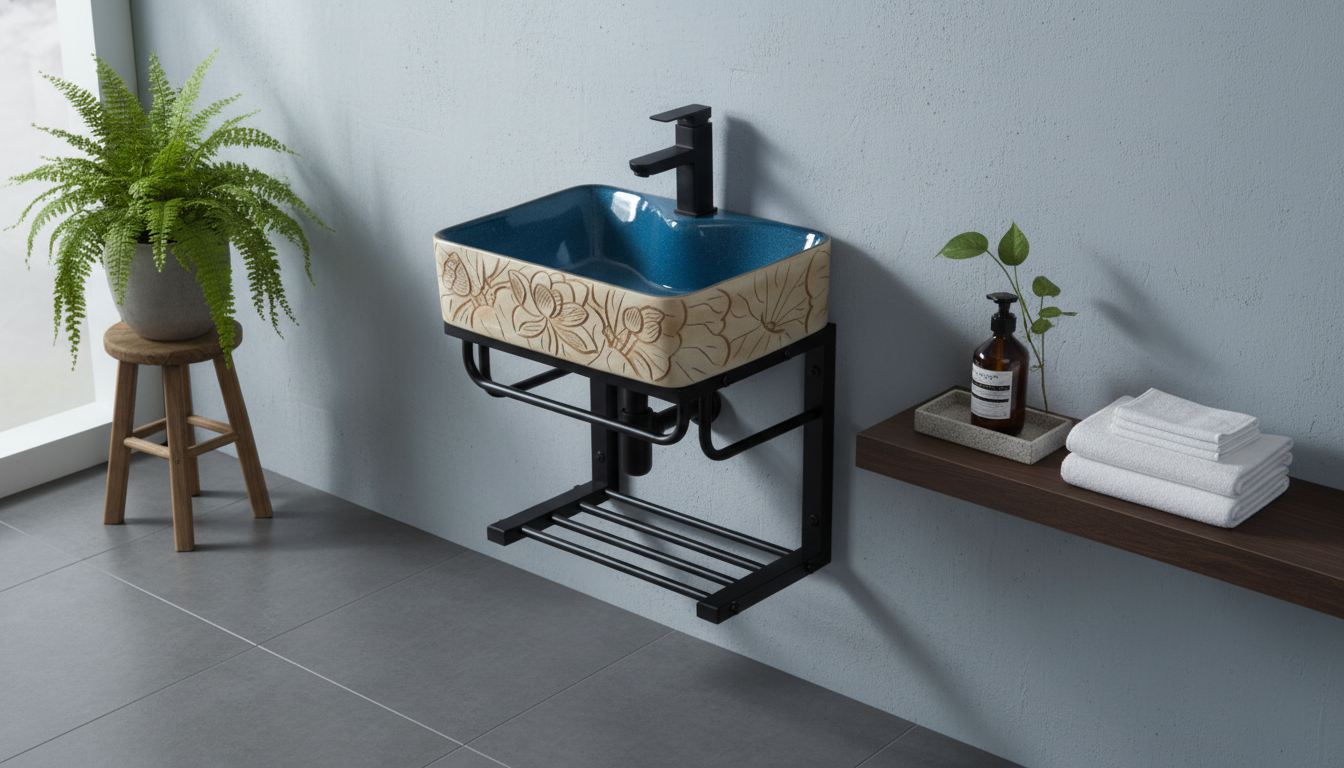
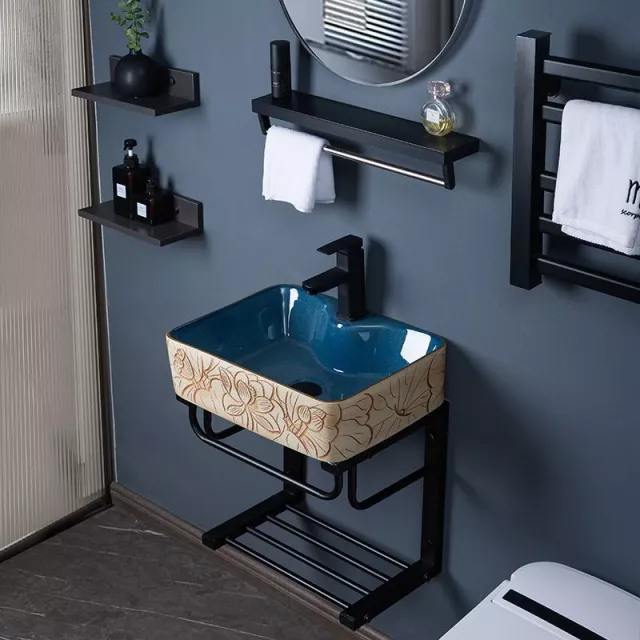
A wall-mounted sink can open up valuable floor space while creating a strong design focal point. This ceramic basin combines a lotus-inspired exterior pattern with a stainless steel stand, balancing decorative texture with a clean, modern support structure. It’s an especially practical choice for powder rooms, guest baths, and compact layouts where durability, easy cleanup, and visual detail all need to work together.
What Makes This Sink Stand Out
- Lotus-pattern ceramic basin: Adds tactile texture and visual interest, creating a decorative centerpiece without relying on bulky cabinetry.
- Wall-mounted format: Keeps the footprint light and makes it easier to clean the floor underneath—helpful in tight bathrooms where every inch counts.
- Stainless steel stand: Provides visible support and a crisp contrast to the ceramic finish, bridging classic and contemporary styles.
- Small-space friendly: A solid fit for powder rooms, guest bathrooms, and smaller primary baths where open circulation matters.
Materials and Build Details
- Ceramic basin: Designed for daily bathroom use and routine cleaning. A well-glazed interior helps water sheet and rinse away more easily.
- Patterned exterior: The lotus texture can visually downplay minor water spotting compared with a fully flat, glossy surface—useful in hard-water areas.
- Stainless steel stand: Intended for humid environments and quick wipe-downs, helping keep the sink area looking polished with minimal effort.
- Glaze quality check: Smooth, consistent glaze coverage around the rim and in the bowl typically translates to easier maintenance and fewer places for residue to cling.
Size, Compatibility, and Key Specs to Confirm
Wall-mounted sinks look simple once installed, but the fit depends on a few practical measurements and compatibility checks. Before buying, confirm the wall structure, faucet type, drain alignment, and clearance for comfortable daily use.
- Wall type and reinforcement: Confirm whether you’re mounting to studs, blocking, or masonry and whether reinforcement is available where the sink will land.
- Faucet setup: Determine whether the basin is meant for a deck-mounted faucet, a wall-mounted faucet, or a single-hole vs. widespread arrangement.
- Drain compatibility: Verify drain size and style (pop-up vs. grid drain) and ensure it matches the basin and trap configuration.
- Room clearance: Measure front clearance for comfortable standing room and side clearance to avoid door swings and tight elbows in narrow powder rooms.
- Stand height and ergonomics: Confirm the installed rim height is comfortable for household users and aligns with any accessibility goals.
Quick Fit Checklist (Measure Before Buying)
| Item to Confirm |
Why It Matters |
What to Measure/Check |
| Mounting wall strength |
Prevents loosening or failure under load |
Stud locations, blocking, or masonry anchors |
| Faucet configuration |
Avoids mismatched holes or reach issues |
Wall-mount vs. deck-mount; spout reach to basin center |
| Drain and trap clearance |
Ensures plumbing fits behind/under the basin |
Drain outlet position; P-trap space; shutoff valve locations |
| Room clearance |
Improves comfort and usability |
Front clearance and side clearance from walls/doors |
| Stand footprint |
Avoids interference with baseboards and flooring transitions |
Stand width/depth; floor flatness |
Installation Notes for Wall-Mounted Sinks with Stands
- Use proper backing and anchors: Hollow drywall anchors alone are often insufficient. A secure installation typically relies on studs, blocking, or appropriate masonry hardware.
- Dry-fit before final tightening: Test the basin, stand, faucet, and trap alignment to catch spacing issues before you commit to wall holes and final seals.
- Seal where recommended: Sealing contact points at the wall and along the basin edge can help reduce the chance of water intrusion behind the sink.
- Level for drainage: Confirm the stand sits flat and the basin is level to avoid pooling and to help water flow cleanly to the drain.
- Plan for code-compliant plumbing: If local code requires specific trap, venting, or shutoff placement, map fittings early so you don’t have to redo connections later. For code references, consult the International Code Council (I-Codes).
Care, Cleaning, and Long-Term Upkeep
For efficiency upgrades that may reduce splashing and unnecessary water use at the faucet, look for fixtures that align with EPA WaterSense guidance.
Style Pairings and Bathroom Design Ideas
How to Choose the Right Wall-Mounted Sink for the Space
- Start with plumbing reality: Matching the sink style to existing supply and drain locations can reduce rework and speed up installation.
- Decide the visual priority: Patterned basins naturally become a focal point; a plain basin recedes and lets tile, mirrors, or lighting take center stage.
- Pick your support approach: A stand adds stability and design presence, while a fully floating sink maximizes openness beneath the basin.
- Balance depth and splash control: Deeper bowls can help reduce splashing in high-traffic bathrooms, especially with higher-flow faucets.
- Plan storage intentionally: Without a vanity, add nearby shelving, a recessed cabinet, or a narrow tower to keep toiletries off the sink rim.
- Keep accessibility in mind: If the bathroom needs to accommodate a wider range of users, verify installed height and clearances. For reference, review the ADA Standards for Accessible Design.
FAQ
Does a wall-mounted sink need extra wall reinforcement?
Most wall-mounted sinks require solid backing—such as studs with blocking or appropriate masonry anchors—to safely support weight and resist movement over time. Follow the manufacturer’s instructions and local code requirements to confirm the correct reinforcement method for your wall type.
Can this sink work with a wall-mounted faucet?
It can, but compatibility depends on the basin’s drilling and the faucet’s spout reach. Confirm whether the sink is designed for wall-mount or deck-mount installation and ensure the spout reaches the basin centerline to reduce splashing.
How is the ceramic pattern kept looking clean?
Use non-abrasive cleaners and regular wipe-downs to protect the glaze and lift residue before it builds up. The textured pattern can help disguise minor spotting, but it still benefits from routine cleaning and gentle hard-water removal when needed.
Recommended for you


Leave a comment